
Most engineers and other people in industry have heard of t-slot (80/20, MayTec, Bosch Rexroth, etc) aluminum. It’s kind of like a grown up erector set, made of extruded aluminum and brackets. You can make just about anything out of it from industrial equipment enclosures to XY plotters to furniture. While is it well suited for these large applications it’s over sized for most smaller DIY type projects. This is where MicroRAX comes in. They supply a miniature version of t-slot measuring just 10mm x 10mm.
Author: thingsimdoing

Solution in Search of a Problem
Years ago I had a Canon GL-1 camcorder, and it came with this massive battery that allowed for 3 or 4 hours of continuous operation. It was one of those generic aftermarket batteries so after a few months the casing started to split apart and would no longer stay attached camera. So for the past 3 years I have been carrying this around with me:

Kinda Homemade Greek Yogurt
I must confess, I have found a new love, and that love is Greek yogurt. It’s like being able to eat a bowl of cream cheese without getting strange looks from your roommates. Seriously, between this and Gyros I think the Greeks may be making the best food around, right behind they guy who created the mini-burger sliders at Chili’s.
Let me rewind a bit, on a recent trip to the grocery store I was offered a scoop of the thickest yogurt I have ever had. They offered me a coupon so I figured I would buy some, however I found that this brand, Fage, was about 4 times as expensive as my regular brand. Put off by the high price, I went home empty handed. Later that day I researched the brand of yogurt further and found it’s called Greek or strained yogurt. It turns out Greek yogurt is just a fancy name for yogurt that has been separated from its whey, which yields the very thick creamy texture.
Here’s all the equipment you’ll need:
- Colander or strainer
- Bowl larger than the colander [note-I wrote this entire post using “bowel” instead of “bowl” the first time]
- Paper towels or cheese cloth
- Yogurt (I prefer plain low-fat)

Machine Shop Madness
Being able to operate basic machining equipment should be an essential skill for every mechanical engineer. It’s really sad how often I hear 3rd and 4th year ME students say they have virtually no practical engineering skills. Granted most ME’s will never be required to operate a lathe or mill as part of their job, knowing the capabilities of the tools that will be producing your products helps you when designing those very same products. College teaches you a lot of equations and methodology, but you don’t really learn anything useful until you start designing and building stuff with your hands. So when I had the chance to take the machine shop course offered by my school I jumped at the opportunity.
Fortunately for me I have access to equipment most home machinists can only dream about. This is a Bridgeport vertical mill with a DRO on the x and y-axis. The device hanging off the right end of the table is a power feed, which comes in handy when making long slow passes in the x direction.

1969 Camaro Detroit Speed Subframe Connector Installation
I finished the installation of sub-frame connectors on my 69 Camaro. While I installed them I also put in some new sub frame bushings. Both came from Detroit Speed & Engineering. Installing these SFC’s is a lot more involved then your standard SFC install on a late model Camaro. The way these are design they are virtually invisible when looking at the side of the car, unlike bolt in ones which hang about 5 inches from the bottom of the car, these follow the contour of the floor pan allowing them to be very low profile. Here’s the write up:
The first item I installed was the sub frame bushings. As some of you may know the first and second generation f-body’s came with a removable front sub frame. The car was a sort of hybrid uni-body. The front sub frame is held in with four body mounts and two that attach to the radiator core support. Here’s the kit from DS&E.

The bushing in the center is for the radiator core support the other two are the body mounts. The new ones are made of aluminum and are hard coated. They came with stainless steel washers.
One Step Forward, One Step Back
If you recall, work stopped on the 383 due to push rod length issues. Because of different valve stem lengths we had to use non stock length push rods. We had ordered them over a year ago, but never really got around to checking how well they worked. The basis for all this is they fact that we were using roller tip rocker arms. An oft overlooked part of engine building is checking where the roller tip contacts the valve stem over the duration of the cam’s lift. When using standard stamped rocker arms this is really a non-issue. The large radius of the contact pad is very forgiving of push rod length issue. However roller tip rockers have a very narrow contact patch. While this reduce horsepower robbing friction, it also puts enormous pressure on a very small area of the valve stem. If this contact patch does not fall on the correct part of the valve stem it can lead to mushrooming (deforming) of the valve stem tip. This picture from Comp Cams illustrates the proper location of the contact patch at various points of a cam’s lift.

Electronics Flea Market
While in the bay area this weekend I stopped at the Electronics Flea Market. This swap meet occurs on the second Saturday of the month during the summer, and is held at De Anza College in Cupertino. The majority of the stuff being sold falls into one of three categories: ham radio equipment from the 40’s, miscellaneous circuit components, and electronics from the 80’s. In addition, most of the cliental are either in their 40’s or in their 70’s. I guess the lure of 30 year old test equipment and tube transistors has a specific audience. At any rate, there were some pretty cool stuff hidden among all the junk.

I had a homework problem in my machine elements course that used this exact gear box.
Continue reading
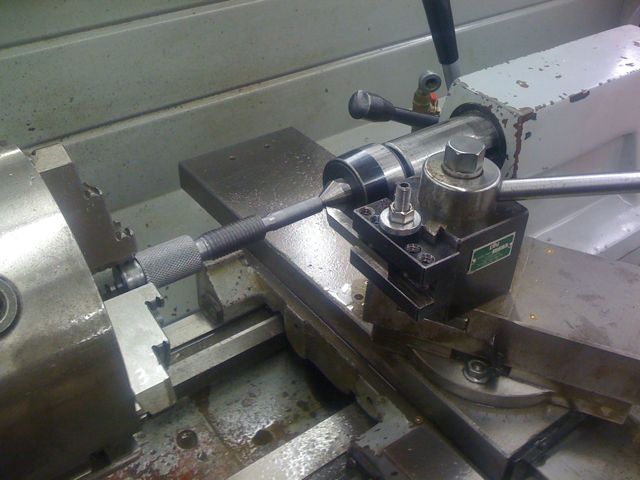
A Little Machining
Single point threading is pretty wild. You’ve got about 15 levers, dials and knobs to keep track of. If you mess up and cross thread your part you have to start over, there really is no fixing it. Fortunately for me everything went well and a 1/2-20 nut threaded onto the shaft smoothly. This is a practice part before I start machining my actual parts.

The Long and Twisted Tale of a 383
This engine has been a long time in the making. I believe talk of building this engine began around 2002-2003. We had a spare 4 bolt main block out of truck that had massive oil consumption issues due to broken piston rings and bad valve stem seals. Being that it was a 4 bolt main block, we wanted to build something a little more special than a run of the mill 350. We decided a 383 would be a fun engine to build and we began to gather parts. It took almost all of 2004 to get the parts together and have all the machining done. The block was boiled, then painted with Chevy orange on the outside and Glyptal in the lifter valley. Glyptal is a paint that is normally used to coat the windings in an electric motor, however engine builders use it to make the oil flow down the lifter valley quicker. A local machine shop bored and honed the cylinders, and line honed the mains. By December 2004 we had all the parts we needed and were ready to assembly it. We added the heads and a partial valve train around 2006 and it has sat in silence since then. Below are some of the details of the assembly of the short block.
It’s based on a 4 bolt main truck block that was pulled from a 3/4 ton ’86 pick up. The rotating assembly consists of an Eagle 5140 steel crankshaft, Eagle H-beam rods, and Speed Pro hypereutectic pistons. The Block was bored, honed and painted. The mains were line honed with an ARP main stud kit installed. The bottom end is very stout, and should handle pretty much any cam/head combo we could dream of.

The bare block with bearing halves installed
E30 BMW Alternator Replacement
The battery in my 1987 325is has been losing its charge recently. It left me stranded at work a few weeks ago. It problem was diagnosed as a bad alternator. with the car on the battery was not being charged. This meant the car was basically running off the battery. Eventually the battery gets so low that the car cannot run properly . Dim lights, rough running, and no accerosires are common symptoms, The alternator had been replaced once before several years ago by my brother, luckily the alternator had a lifetime warranty through AutoZone so it cost me nothing.
First gather your tools:

