
For a while now I’ve been wanting to get an espresso machine. After several hours researching machines in specialty coffee forums, I was surprised to find that the quality of the coffee grinder actually has a bigger impact to the taste of the espresso than the actual machine does. Spending a lot of money on an espresso machine and then skimping on the grinder will usually get you poor results. With that in mind, I focused on getting a good grinder first.
The recommendations online were to spend about 50% of your total budget on the grinder, which put me in the $150-200 range. I initially looked at Baratza’s entry-level grinders, but most reviews claim its finest setting is borderline usable for espresso.
Side note: If you haven’t seen them yet, Seattle Coffee Gear has an amazing range of reviews, head-to-head comparisons, and tutorial videos. They were an excellent resource when I was researching equipment https://www.seattlecoffeegear.com.
Knowing that the higher end coffee equipment tends to be more durable, I decided to look for a used grinder that would have otherwise been out of my price range. I combed Craigslist for a few weeks, but never really found anything worth looking at.
Then one day I came across an ad cryptically titled “Coffee Bean Grinder $10”. I clicked the ad and saw a filthy, broken, coffee grinder. The price suddenly made more sense. Looking closer I noticed it had a doser. This isn’t something you typically see on low-end grinders, as it’s really only needed for coffee shop/restaurant applications. There was no mention of a brand, but a photo from the back showed a label “BEST MILANO”. A quick search online dug up the manufacturer, Anfim, a fairly high-end brand from the 80’s and 90’s. The ad also said it was stuck on one grind setting. Coffee grinders tend to be simple mechanically, so I took a chance on it being an easy fix. I made contact with the seller and setup a meeting the next day.
I arrived to meet a nice, elderly women who was selling the grinder for her husband. She said they had purchased the grinder over 20 years ago at a cost of around $500. Her husband recently switched to pour over coffee which necessitated a coarser grind. This one, being stuck on a very fine setting, was destined for the garbage before the wife offered to put it on Craigslist in case someone wanted it. That someone was me.
I took the grinder to a friend’s house and began inspecting it. The first thing I noticed was how incredibly heavy this small grinder was. Even without taking it apart, I could tell the base was solid cast aluminum with a serious motor. Judging by the thick layer of coffee oils and residue inside the hopper, this grinder hasn’t been cleaned since the Reagan administration.


I verified that indeed the adjustment collar was stuck at setting 4.
The brown stuff here may look like coffee dust, but it’s actually a ~0.050″ thick layer of coffee sludge.


The bean hopper (PN 702711)is removed by simply lifting it up and out of the upper burr carrier. Make sure the hopper is empty before you remove it, this model doesn’t have any kind of valve to keep beans in.
Ordinarily the upper burr carrier (PN 702740) would be removed by just unscrewing it counter clockwise. This might have been the case if someone had actually cleaned this area at least once in its life. In my case it wouldn’t budge. I probably could have used a strap wrench to unscrew it, but being without one, I grabbed a friend. With him hold the base and me grabbing the burr carrier we put everything we had into it.
Dramatic reenactment:

The first 2 or 3 revolutions were extremely difficult. After breaking through the coffee oil thread locker, the carrier unscrewed easily.

The dark film at the base of the threads was acting like a thread locker, bonding the upper burr carrier to the base. It’s no surprise the previous owner thought it was jammed.

Fortunately the burrs were in pretty good shape. Replacement burr sets are easy to come by and cost around $40.
After getting the burr carrier out, I turn my attention to the back cover. There weren’t any visible fasteners, so I assumed it was held on by a snap or clip. A fingernail at the seam allowed me to open it up just enough to see that there was a wire spring clip holding it to the base. Once you pull the cover back enough to clear the base, you just slide it down off the clip.


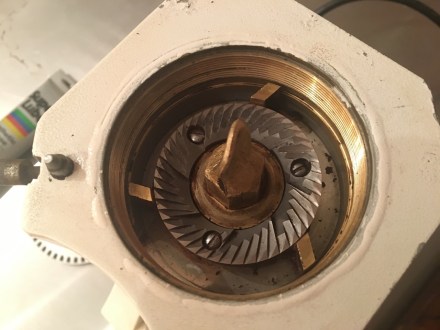
Without the rear cover in place, you get a nice view of the insides. Behind the motor shaft are the bolts that hold the doser to the housing. The white cylinder on the right is a starting capacitor for the motor. And just peaking out from the bottom is the motor (specifically the stator). This grinder is what’s know as a direct drive grinder. There are no belts or gears in the drive line, the lower burr is directly connected to the output shaft of the motor. This is typical of higher end grinders. Using belts or gears allows the manufacturer to use a smaller, cheaper motor. The gear reduction in the gears or belt drive increase the torque output of the small motor. However these components can be the source of additional break downs. More bearings to wear out, belts to break, and gears to strip. Probably less of a concern for the home user, but if you’re running a coffee shop, having a your grinder break is going to have an impact on your business.
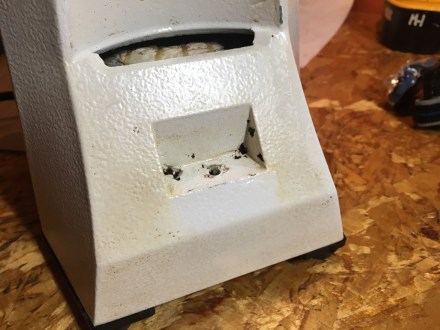
The main bolt that holds the doser to the body is directly behind the motor shaft. It’s also the most hilariously over sized bolt I’ve seen in awhile. Getting to it from the rear opening was pretty much impossible without an offset wrench or crowfoot socket.
After staring at the problem for a few minutes, I realized I might be able to get at it with a regular combination wrench through the switch opening.

This worked, but was time-consuming as it could only turn the bolt a few degrees at a time. I’ll replace this with a socket head screw later on, as this will allow me to use a ball end hex key to get around the motor shaft.

Hopefully this picture gives you an idea of what I was up against in terms of the sludge. At first I thought the doser jar may have originally been a brownish orange smoked plastic, but the few clean spots suggested it started out clear.

No vintage equipment rebuild would be complete without a dead creature buried in the depths of the machine. Ours was in the form of a spider holed up in the space between the motor and bottom cover.

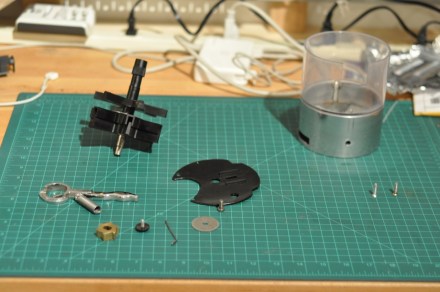
The doser rebuild started with a complete disassembly.


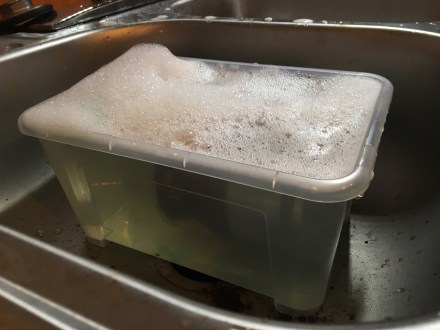
The weapon of choice against the coffee sludge was hot soapy water. This was pretty effective on 80% of areas. The other 20% required a scouring with a Scotch Brite pad followed by repeated soakings. As a last step I used some Novus plastic polish to remove the remaining haze.
Right below the lower burr carrier is a pocket the drive shaft bearings sit in. I was worried about flooding this with water and not being able to dry out the bearing. So for this area, I just used a pick, screwdriver, small wire brush, vacuum, and a wet paper towel. It took about a half hour, but I managed to get it almost completely clear.
Surprisingly the outer case was about the cleanest part of the grinder. The slight brown tint was taken off by scrubbing with melamine foam (aka Mr. Clean magic eraser). To give you an idea how effective this material is, the small area right below cutout was cleaned in the below photo.
With everything cleaned, assembly started with the doser.
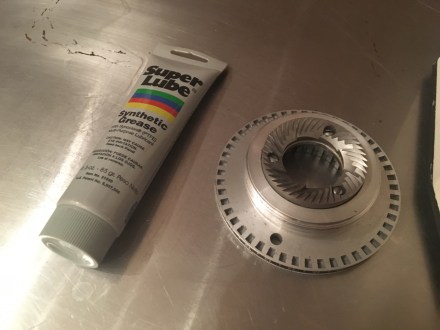
I lubricated the doser ratchet with Super Lube, as it was the only food grade lubricant I had on hand. Not visible is a small pin and spring that fits inside the doser level. This pin is the ratchet pawl that actually rotates the doser arms when the lever is moved.


Before and after.
I little bit of grease on the burr carrier’s threads and it was moving quite smoothly. You can see the detents on the bottom of carrier. Those interface with the pin on the side of the grinder for holding a particular grind setting.
Some final shots all cleaned up.


Depending on the age of the coffee I usually have it set between 3.5 and 4.5. Sometimes I find myself sitting between grind settings, but I can usually compensate with the tamp pressure. A possible future conversion to step-less settings should take care of this.
Between the purchase price of the grinder and some cleaning materials I have about $30 invested. Using it the last few weeks has been great, and I am really glad I took a chance on this basket case. The added bonus of saving it from the land fill was also nice.
One last note, Anfim was the original manufacturer of this grinder, but it was rebranded a lot over the years. A partial list from home-barista:
- ECM
- Elektra
- Francesconi
- Grindmaster
- La Pavoni
- La Spaziale
- Olympia Express
- Pasquini
- Stafco
- Vibiemme
- Wega
