Due to a job change I no longer have access to the plethora of tools at my old job. While there are some local hackerspaces, I really like having access to equipment whenever inspiration strikes, rather than having to wait unil the hackerspace is open (also working in your boxers on a Saturday morning). So I am setting up a small workshop in my apartment living room, were I plan to do everything from soldering to machining. This will be the first in a series of articles showing how I setup and fill this space with various toys.
Every good work shop starts with a good workbench. My money-is-no-object bench would be a Lista cabinet with a maple butcher block top.
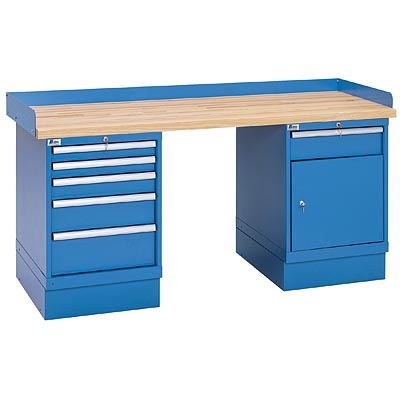 Unfortunately these are disgustingly expensive when bought new and, unless you get lucky on craigslist or an auction, they are still expensive used. My goal is to replicate the Lista bench, but for an order of magnitude cheaper.
One of the first things you should do when designing a workbench is to think hard about what you will actually be using it for. A bench designed for SMT electrical work is a lot different than one for taking engines apart. I plan to use my bench for tool storage, some soldering/electronics, parts storage, machining (once I get a small mill and lathe), light assembly, and taking things apart. I took each of those tasks and figured out what requirements they would impose on my design.t
For tool storage (specifically, hand tools) the Lista cabinets are great as the many thin drawers allow for an enormous amount of storage in a small footprint. Lista cabinets are very similar to rolling tool carts found in garage shops (minus the caster wheels), so that’s where I started looking. I spent several hours researching rolling tool carts on garage journal and reached several conclusions. If you’ve got the money, tool truck boxes (snap on, matco, etc) are hard to beat. They offer the best construction, but at a hefty price tag. Surprisingly, Craftsman tool boxes were generally regarded as the worst quality, people described them as having thin gauge sheet metal, and really bad drawer slides. Also surprisingly, Harbor Freight tool boxes were said to be the best tool box for your money, decent quality, but still affordable.
I ended up getting Harbor Freight item#67831 and selling off the top box to recover some funds. Make sure you get the 26″ model, the brownish 30″ one is much lower quality.
With the tool storage figured out I started looking for a work surface. I like working on wood, as I can sand down and refinish it when it becomes too loaded up with crud (it also looks nice). I went looking for a low cost alternative for the maple top on the Lista bench, and found the Numerar series countertops from Ikea.
It isn’t as deep as I’d like (25″), but the construction (almost 1.5″ thick beech!) and price were spot on. I ended up getting the longer 96″ version, figuring I could always trim it down and use the extra as a lower shelf.
Next up were finding sturdy legs. I considered using wood 4×4 posts, but since this is in my living room and very visible, I wanted it to look a little nicer. I chose speed rail fittings and 1 1/4″ sch 40 aluminum pipe, as they are very strong, but gave it a slightly industrial look. I later found out that McMaster has a nice selection of pre made work bench legs, some with cut outs for electrical outlets.

For medium sized parts storage I wanted to utilize the area under the work surface by hanging pull out drawers. Since I don’t have access to a cabinet shop to make custom drawers, I came up with my own solution. In my experience work bench drawers usually end up as a disorganized pile of random parts you don’t know what else to do with. Since the drawers are just one large space everything ends up mixing together.

My solutions to this was bins with a divider grid system. These bins are dividable down to spaces 1″x1″, allowing for the creation of all sort of odd sides compartments. They also come in a variety of depths and colors, and are stackable.
The drawers slides ended up being one of the harder problems to solve. How do I hang these bins on the under side of the work surface? They have a large lip, and sloped sides so I couldn’t just attach off the self drawer slides. I considered building a self underneath that they could rest on, but interfacing with the speed rail was problematic. I really needed a bracket that the bins could slide on, supported by the lip that runs along the outside. If you know machine tools think of it like box ways. I initially thought about making my own from aluminum square tubing, but that would have been a lot of machining time to cut all the slots and holes (I needed to make about 8-10 slides).
I was browsing McMaster one day and found this aluminum extrusion that is normally used as trim around panels. It has the perfect shape to function as a slide, but still allow me to have a spot to screw it to the underside of the bench.

With all the parts acquired I could start putting it all together. I first layer out the hole pattern for the leg fittings, insetting them slightly for appearance.

3/16″ clearance hole for a 1/4″ lag bolt.

The drawer slides came next, I drilled and counter sunk holes for #8 wood screws. I had to counter sink them as the drawer would hit any fastener proud of the surface when pulled out.

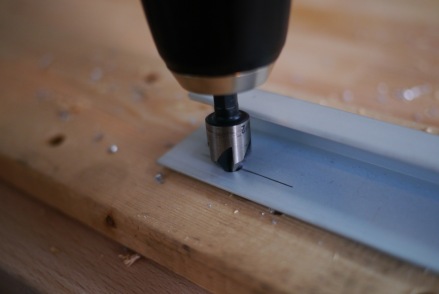

Aligning and spacing all the slides.


Here’s the almost finished bench. I put on several coats of tung oil to act as a sealer, turning it a golden color. After this was taken I also added an additional leg in the center towards the front, as it needed a little more support mid-span.
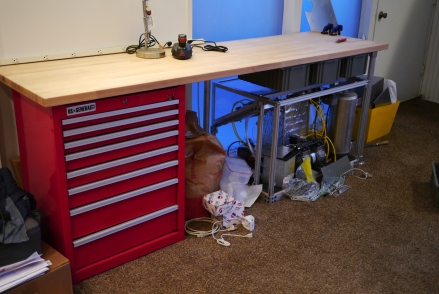

I ended up using the full length of the counter top material since it fit in the space and you can never have enough work surface.
If you’re curious here’s a few shots of the drawers filled with parts.


